Monday, September 10, 2012

iPhone Application Icon example

iPhone Application Icon

The example will illustrate how to add an icon on the iPhone application in Xcode. Before adding the application icon in iPhone make sure that the icon size is 57x57 and it should be a png one.
To get an application icon in iPhone simulator.. add the "png" icon that you want to be displayed as your application icon under resources folder.
Then open up the "info.plist" file that resides under resources folder, there you will find a key Icon file. In its value specify the name of your "png"(app icon name). It would then be visible on you simulator.


Download Code

MapView Example in iPhone example

MapView Example in iPhone

The example illustrate how to embed or display a MapView in iPhone SDK UIView based application.
To embed a Map in your iphone application just follow the given steps..
1. Create a new project (ViewBased application )
2. Import the MapKit in header file...
#import <MapKit/MapKit.h>
also add the MapKit.framework under resources folder from the existing frameworks.
3. In the same viewController's header file call the <MKMapViewDelegate> and define the MKMapView *myMapView; synthesize and release the myMapView object into implementation file.
4. In a viewcontroller.xib file ..add the map view on UIView and connect it with corresponding object in file owner. Further see the code given below….
Header
#import <UIKit/UIKit.h>
#import <MapKit/MapKit.h>
@interface myMapViewController : UIViewController <MKMapViewDelegate> {

IBOutlet MKMapView* myMapView;
}
@property (nonatomic, retain) IBOutlet MKMapView* myMapView;
-(void)displayMYMap;
@end
Implementation
#import "myMapViewController.h"
@implementation myMapViewController
@synthesize myMapView;
// Implement viewDidLoad to do additional setup after loading the view, typically from a nib.
- (void)viewDidLoad {
[super viewDidLoad];

myMapView = [[MKMapView alloc] initWithFrame:self.view.bounds];
myMapView.delegate=self;

[self.view addSubview:myMapView];
[NSThread detachNewThreadSelector:@selector(displayMYMap) toTarget:self withObject:nil];

}

-(void)displayMYMap
{
MKCoordinateRegion region;
MKCoordinateSpan span;
span.latitudeDelta=0.2;
span.longitudeDelta=0.2;

CLLocationCoordinate2D location;

location.latitude = 22.569722 ;
location.longitude = 88.369722;


region.span=span;
region.center=location;

[myMapView setRegion:region animated:TRUE];
[myMapView regionThatFits:region];
}

- (void)didReceiveMemoryWarning {
// Releases the view if it doesn't have a superview.
[super didReceiveMemoryWarning];

// Release any cached data, images, etc that aren't in use.
}

- (void)dealloc {
[super dealloc];
[myMapView release];
}
@end
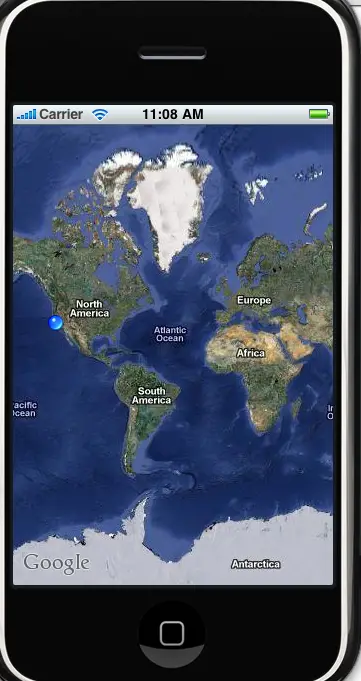
Build the application to display the map view on UIView. It should look like the given image.

Download code of MapView Example in iPhone

iPhone MapView Current Location in iphone example

iPhone MapView Current Location

This is a simple MKMapView example in iPhone for the beginners. In the example we'll discuss about how to display a map on UIView. You can also display the map in different styles by assigning different mapTypes such as Standard, Satellite and Hybrid.
And apart from it, we can also show the current location on the map. By default on simulator it will show the US as current location but on running the application in iPhone it will give you the correct location.
To get the MKMapView in our application we'll have to include the MapKit.framework in frameworks folder and also required to import the mapkit in header file as given below...
#import <MapKit/MapKit.h>
In the same .h file create the IBOutlet and property for the MKMapView as given below..
#import <UIKit/UIKit.h>
#import <MapKit/MapKit.h>
@interface mapviewViewController : UIViewController {
IBOutlet MKMapView *mapview;
}
@property(nonatomic, retain) IBOutlet MKMapView *mapview;
@end
and in the .m, viewDidLoad method just add the given line of codes..
- (void)viewDidLoad {
[super viewDidLoad];
//mapview.mapType = MKMapTypeSatellite;
//mapview.mapType=MKMapTypeStandard;

//mapType
mapview.mapType=MKMapTypeHybrid;
//will show the current location
mapview.showsUserLocation = YES;

}
do not forget to add the MapView on UIView in interface builder. Also link it to the file owner otherwise it'll not show anything.
On building the application your application should look alike the given image.

Download Code

scheduledTimerWithTimeInterval Example in iphone example

scheduledTimerWithTimeInterval Example

scheduledTimerWithTimeInterval is a one of the class method of the NSTimer class, which is used to create timers. In general, we can say that NSTimer creates a object that sends a message to another object telling it to when to fire a timer or update it in a certain time intervals. And "scheduledTimerWithTimeInterval" schedules the timer into RunLoops that has two different methods to write it...
scheduledTimerWithTimeInterval:invocation:repeats: and
scheduledTimerWithTimeInterval:target:selector:userInfo:repeats:
that basically creates the timer and schedules it on the current run loop in default mode. We will see this through a example...
In the example, first of all we'll create a timer, will pass the NSTimer object to our method and then we can stop the timer.
Creating a timer with the scheduledTimerWithTimeInterval
NSTimer* timer = [NSTimer scheduledTimerWithTimeInterval:.1 target:self selector:@selector(moveRect) userInfo:nil repeats:YES];
"scheduledTimerWithTimeInterval:.1" setting the duration of time for the timer, and if you set "repeats:YES" timer will repeat calling the selector every time in the given duration.
"moveRect" is the name of method that is called by @selector.. and to stop the timer we can simply write
[timer invalidate];
Example Code:
#import <UIKit/UIKit.h>
@interface timerViewController : UIViewController {
NSTimer* timer;
}
@end
---------------
#import "timerViewController.h"-
@implementation timerViewController
- (void)dealloc {
[super dealloc];
}
- (void)viewDidLoad {
[super viewDidLoad];

CGRect RectFrame;
RectFrame.origin.x = 25;
RectFrame.origin.y = 300;
RectFrame.size.width = 20;
RectFrame.size.height = 20;

for(int i = 0; i < 10; i++)
{
UIView *myView = [[UIView alloc] initWithFrame:RectFrame];
[myView setTag:i];
[myView setBackgroundColor:[UIColor orangeColor]];

RectFrame.origin.x = RectFrame.origin.x + RectFrame.size.width + 10;
[self.view addSubview:myView];
}

timer = [NSTimer scheduledTimerWithTimeInterval:.1 target:self selector:@selector(moveRect) userInfo:nil repeats:YES];
}
-(void)moveRect
{
int r = rand() % 10;

for(UIView *aView in [self.view subviews])
{
if([aView tag] == r)
{
int movement = rand() % 100;
CGRect RectFrame = aView.frame;
RectFrame.origin.y = RectFrame.origin.y - movement;

[UIView beginAnimations:nil context:NULL];
[UIView setAnimationDuration:.2];
[aView setFrame:RectFrame];
[UIView commitAnimations];

if(RectFrame.origin.y < 0)
{
[timer invalidate];
}
}
}
}
- (void)didReceiveMemoryWarning {
// Releases the view if it doesn't have a superview.
[super didReceiveMemoryWarning];

// Release any cached data, images, etc that aren't in use.
}
- (void)viewDidUnload {
// Release any retained subviews of the main view.
// e.g. self.myOutlet = nil;
}
@end
On running the application... it should look like the given image

Download Code

UITableView Background Color in iphone example

UITableView Background Color

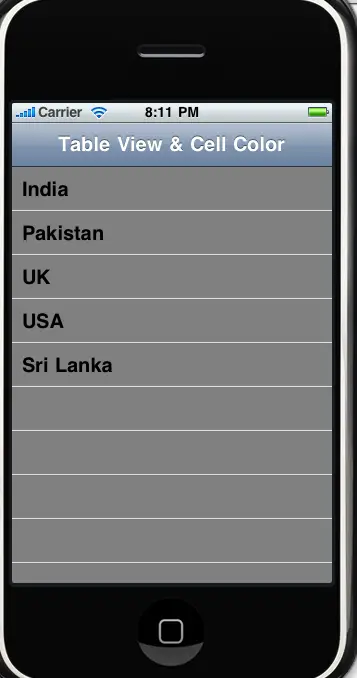
To change the background color of UITableView in iPhone application, you just need to write the given line of code into the tableView cellForRowAtIndexPath.
tableView.backgroundColor = [UIColor grayColor];
The above line will change the default background color into gray color. You can also set the gradient to it.
In this example we are simply changing the color of all the cells or table view background. But you can also draw different styles to it.. table view also provides properties that allows you to add image at background.
On building the application it should look like the given image..


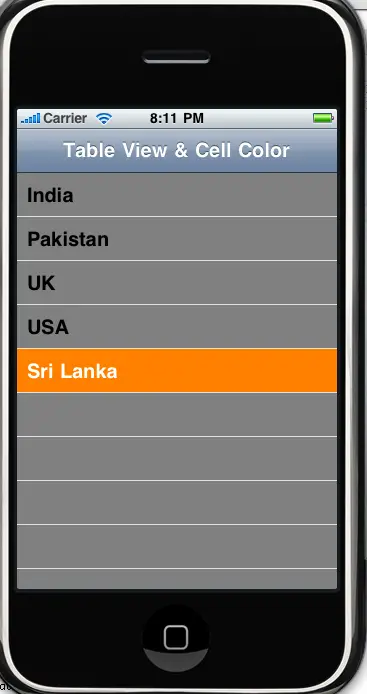
In the image two you can see that on click, cell is showing different color or highlighted. This can be done by setting the cell color on click.
//To Set Selected Background Color
UIImageView *selectedBackground = [[UIImageView alloc] initWithFrame:CGRectMake(0,0, 320,100)];
selectedBackground.backgroundColor = [UIColor orangeColor];
[cell setSelectedBackgroundView:selectedBackground];
Download Code

iPhone Change Button Text in iphone example

iPhone Change Button Text

The example illustrate how to change the text of UIButton on click. Basically UIButton is a object that is handled by UIControl class, which defines the behavior of all the objects such as UIButton, UILabel, sliders etc..

UIControl has number of states ...that can be recognized depending on the control.
enum {
UIControlStateNormal = 0,
UIControlStateHighlighted = 1 << 0,
UIControlStateDisabled = 1 << 1,
UIControlStateSelected = 1 << 2,
UIControlStateApplication = 0x00FF0000,
UIControlStateReserved = 0xFF000000
};
In our example we are going to change the text on UIButton on click and selection. To get the desired output we are using two different states of UIControl class...
1. UIControlStateNormal
2. UIControlStateHighlighted
iPhone SDK App - Change UIButton Text on Different States

For Normal State
[button setTitle:@"Normal" forState:UIControlStateNormal];
On selection
[button setTitle:@"Selected" forState:UIControlStateHighlighted];
In the above line of code "setTitle" is setting the title for button in different states... and "forState" will set the desired state.
Change UIButton Text Color: a developer can also change the text color on different states with the help of given code...
[changeText setTitleColor:[UIColor purpleColor] forState:UIControlStateNormal];
Download Code

UIWebView Background Color in iphone example

UIWebView Background Color

If you wanted to change the background color on UIWebView in iPhone SDK, then you required to set the background color of UIWebView using UIColor. UIColor object represents color and opacity (alpha value). Where as setBackgroundColor will allow you to change the color of background area of UIWebView or UIView.
This example illustrate you how to change the color of UIWebView in iPhone SDK based application. To change the color of background first we need to set the backgroundcolor as clearColor and then set the required color to it as given in the following code.
- (void)viewDidLoad {
[super viewDidLoad];

[webView loadRequest:[NSURLRequest requestWithURL:[NSURL URLWithString:@"http://www.google.com/"]]];

//Set the UIWebView background color and opaque:NO
[webView setBackgroundColor:[UIColor clearColor]];
[webView setBackgroundColor:[UIColor purpleColor]];
[webView setOpaque:NO];

}
On running the application you'll find the output similar to give image.

Download Code

UIIMageView Add Image in iphone example

UIIMageView Add Image

"initWithImage" is a image declaring method that is used to declare the image while while creating a UIImageView.
Syntax of initWithImage method
- (id)initWithImage:(UIImage *)image;
a simple example
//declare the Image
UIImage *one = [UIImage imageNamed:@"myImage.png"];
//creating a UIImageView
UIImageView *imageView1 = [[[UIImageView alloc] initWithImage:one] autorelease];

//to add image on view
[self.view addSubview:imageView1];


You can write and run the above given lines of code into the "ViewDidLoad" method.

iPhone Single Tap and Double Tap Example

iPhone Single Tap and Double Tap Example

The example discuss about single tapping / double tapping on UIView and it also explains how to represent the UIIMage in different modes such as displaying image on the Top, center or bottom of the UIView. You can also zoom in or out the image on single or double tap… the "UIViewContentMode" implements all these methods with the certain modes as given below…
List of given UIViewContentMode
UIViewContentModeScaleToFill
UIViewContentModeScaleAspectFit
UIViewContentModeScaleAspectFill
UIViewContentModeRedraw
UIViewContentModeCenter
UIViewContentModeTop
UIViewContentModeBottom
UIViewContentModeLeft
UIViewContentModeRight
UIViewContentModeTopLeft
UIViewContentModeTopRight
UIViewContentModeBottomLeft
UIViewContentModeBottomRight
In the example, to detect the end of tapping we'll use the UITouch method "touchesEnded:withEvent:" that tell's the receiver that one or more fingers have been lifted from the associated UIView. We'll also write the method to count the Tap.
See the code given below…
- (void)touchesEnded:(NSSet *)touches withEvent:(UIEvent *)event {

//Get all the touches.
NSSet *allTouches = [event allTouches];

//Number of touches on the screen
switch ([allTouches count])
{
case 1:
{
//Get the first touch.
UITouch *touch = [[allTouches allObjects] objectAtIndex:0];

switch([touch tapCount])
{
case 1://Single tap
imgView.contentMode = UIViewContentModeCenter;
break;
case 2://Double tap.

imgView.contentMode = UIViewContentModeLeft;

break;
}
}
break;
}

}

Download code

Dev iphone UIView Access Subviews in iphone example

UIView Access Subviews

In the example, you'll learn how to create and access a subview on UIView.
Syntax of adding subview at UIView.
- (void)addSubview:(UIView *)view;
Creating and accessing a subview : In the example we are creating & adding a UIImageView on the UIView as a subview programatically. The method can be written into the "viewDidLoad" method that do the additional setup after the loading view.
a simple example:
- (void)viewDidLoad {
[super viewDidLoad];

UIImage *one = [UIImage imageNamed:@"imagename.png"];
UIImage *two = [UIImage imageNamed:@"Krishna_Arjuna.png"];

//Creating a subview
UIImageView *imageView1 = [[[UIImageView alloc] initWithImage:one] autorelease];
UIImageView *imageView2 = [[[UIImageView alloc] initWithImage:two] autorelease];

imageView2.alpha = 0;

//Adding subview
[self.view addSubview:imageView1];
[self.view addSubview:imageView2];

}

Download Code

iPhone Pick images from Photo Library iphone example

iPhone Pick images from Photo Library

In this example application we are going to show you how to pick an image from photo library.

To choose the photo from the photo library we required to call three different delegates in the @interface class.
1.UINavigationControllerDelegate - We required this method to perform some actions such as pushed and popped that would not be on the scope of your view controller.
2.UIActionSheetDelegate - implements the button actions and any other custom behavior.
3.UIImagePickerControllerDelegate - This methods of this protocol notify your delegate when the user either picks an image or movie, or cancels the picker operation.
a Simple Example:
Header File - PhotoLibraryViewController.h
#import <UIKit/UIKit.h>
@interface PhotoLibraryViewController : UIViewController <UINavigationControllerDelegate ,UIActionSheetDelegate, UIImagePickerControllerDelegate>{

IBOutlet UIButton* openLibrary;
}

@property(nonatomic, retain)IBOutlet UIButton* openLibrary;
-(IBAction)openPhotoLibrary:(id)sender;
@end
Implementation file - PhotoLibraryViewController.m
#import "PhotoLibraryViewController.h"
#import <AudioToolbox/AudioServices.h>

@implementation PhotoLibraryViewController
@synthesize openLibrary;

- (void)dealloc {
[super dealloc];
[openLibrary release];
}

- (void)viewDidLoad {
[super viewDidLoad];
}

-(IBAction)openPhotoLibrary:(id)sender
{

UIActionSheet *actionSheet = [[UIActionSheet alloc]
initWithTitle:nil
delegate:self
cancelButtonTitle:@"Cancel"
destructiveButtonTitle:@"Photo Library"
otherButtonTitles:nil];
actionSheet.actionSheetStyle = UIBarStyleBlackTranslucent;
[actionSheet showInView:self.view];
[actionSheet release];
}

- (void)actionSheet:(UIActionSheet *)actionSheet clickedButtonAtIndex:(NSInteger)buttonIndex
{

if (buttonIndex == 0)
{
NSLog(@"ok One");

UIImagePickerController * picker = [[UIImagePickerController alloc] init];
picker.delegate = self;
picker.sourceType = UIImagePickerControllerSourceTypeSavedPhotosAlbum;
[self presentModalViewController:picker animated:YES];
[picker release];

}

if (!(buttonIndex == [actionSheet cancelButtonIndex])) {
NSString *msg = nil;

[msg release];
}
}
- (void)didReceiveMemoryWarning {
[super didReceiveMemoryWarning];
}

- (void)viewDidUnload {
}

@end
In the example, we are opening a photo library on button click. So you need to take a button at nib file and connect it with the appropriate action in file owner.
Run the application.. the output should be similar to given image.


Download code

Dev iphone UIButton setTitle:forState: in iphone example

UIButton setTitle:forState:

setTitle:forState: is the method of UIButton Class, which is used to set the title of the UIButton for different states. These states could be any from the given list…
UIControlStateNormal = 0,
UIControlStateHighlighted = 1 << 0, // used when UIControl isHighlighted is set
UIControlStateDisabled = 1 << 1,
UIControlStateSelected = 1 << 2, // flag usable by app (see below)
UIControlStateApplication = 0x00FF0000, // additional flags available for application use
UIControlStateReserved = 0xFF000000

By default the state is normal.
Syntax of setTitle:forState:
- (void)setTitle:(NSString *)title forState:(UIControlState)state

The "setTitle:forState:" methods takes two parameter "Title" and "State".
Title: is a text that will be displayed on the UIButton for the given state, where as the "State" is the current form of the control. For example a button could be in any form selected or normal. The UIButton will always display the title for assigned state.
See the example below…
- (void)myButton
{
UIButton *button = [UIButton buttonWithType:UIButtonTypeRoundedRect];
[button addTarget:self action:@selector(ButtonPressed:) forControlEvents:UIControlEventTouchDown];

[button setTitle:@"My Button" forState:UIControlStateNormal];

button.frame = CGRectMake(80.0, 210.0, 160.0, 40.0);
[self.view addSubview:button];
}

-(void)ButtonPressed:(id)sender
{
// here you can access the object which triggered the method
// for example you can check the tag value

NSLog(@"hello!!");
}

In the above example, the UIButton title is set for the state normal …so it'll show the title once the button get loaded.
Download Code

UITableViewCell Wrap Text - an Example

UITableViewCell Wrap Text - an Example

In the example, we are discussing about the setting of UITableViewCell to warp the text in multiple lines. Though you can do the setting directly through nib, but in the example we are doing it programatically.
UILineBreakMode is the property of UITableViewCell that is used to break the text or wrap the text in multiple lines. We are using the UILineBreakModeWordWrap property in the example.
List of other available UILineBreakMode properties:
- UILineBreakModeWordWrap = 0, // Wrap at word boundaries
- UILineBreakModeCharacterWrap, // Wrap at character boundaries
- UILineBreakModeClip, // Simply clip when it hits the end of the rect
- UILineBreakModeHeadTruncation, // Truncate at head of line: "...wxyz". Will truncate multiline text on first line
- UILineBreakModeTailTruncation, // Truncate at tail of line: "abcd...". Will truncate multiline text on last line
- UILineBreakModeMiddleTruncation, // Truncate middle of line: "ab...yz". Will truncate multiline text in the middle

a Simple Example:

// Customize the appearance of table view cells.
- (UITableViewCell *)tableView:(UITableView *)tableView cellForRowAtIndexPath:(NSIndexPath *)indexPath {

static NSString *CellIdentifier = @"Cell";

UITableViewCell *cell = [tableView dequeueReusableCellWithIdentifier:CellIdentifier];
if (cell == nil) {
cell = [[[UITableViewCell alloc] initWithStyle:UITableViewCellStyleDefault reuseIdentifier:CellIdentifier] autorelease];

// set font style, modes & lines.
cell.textLabel.font = [UIFont fontWithName:@"Helvetica" size:12.0];
cell.textLabel.lineBreakMode = UILineBreakModeWordWrap;
cell.textLabel.numberOfLines = 3; // 0 means no max.


}

// Configure the cell.
NSString *cellValue = [array objectAtIndex:indexPath.row];
cell.textLabel.text = cellValue;

return cell;
}
the Output is:

Download Code

Dev iphone Declaring Method in Objective C in iphone example

Declaring Method in Objective C

In Objective C we can declare two types of methods "Class Method" and "Instance Method" Where + sing denotes the Class method and - sign denotes the Instance method.
For example:
+ (void) printData;
- (void) printData;
The forgoing Objective C methods are declared without parameters. It only takes method type (+ & -), return type (void) and the method name (printData).
You can also declared a method with parameters. Objective C Method also accept more then one parameter. for example…
Objective C method declaration with single parameter:
+ (void) getId: (NSString *) yourId;
- (void) getId: (NSString *) yourId;

Objective C method declaration accepts more than one parameter:
+ (void) getId: (NSString *) yourId andName : (NSString *) yourName;
- (void) getId: (NSString *) yourId andName : (NSString *) yourName;

Dev iphone Methods in Objective c in iphone example

Methods in Objective c

The example discuss about method in objective c. In objective c programming language method can be declared using either "+" or "-" sign.
If the method is declared with "+" sign suggest that it's a class method where as method that begins with the "-" sign makes it a instance method. The method declaration in objective c also take arguments and return types. Argument can be declared after " : " sign.
In Objective c, we writes the codes in two different files " interface" and "implementation" and the extension for these files are .h and .m respectively.
In the header file (.h) we generally, declares the variables, methods and superclass name where as an implementation files holds the operation codes of those methods.
To write a method in objective c .. just follow the given steps:
1. Declare the method in header(.h) file.
2. and implement it into the .m file
a simple example:
Header File(.h)
#import <UIKit/UIKit.h>
@interface methodViewController : UIViewController {

NSString *string;

UIButton* button;
UILabel* label;
}
@property(nonatomic,retain)IBOutlet UIButton* button;
@property(nonatomic,retain)IBOutlet UILabel* label;
-(void)print:(id)sender;
@end
Implementation file (.m)
#import "methodViewController.h"
@implementation methodViewController
@synthesize button;
@synthesize label;

- (void)dealloc {

[super dealloc];
[button release];
[label release];
}
-(void)print:(id)sender {

string= @"method declaration in Objective C";
label.text =string;

}
// Implement viewDidLoad to do additional setup after loading the view, typically from a nib.
- (void)viewDidLoad {
[super viewDidLoad];
}
- (void)didReceiveMemoryWarning {
// Releases the view if it doesn't have a superview.
[super didReceiveMemoryWarning];

// Release any cached data, images, etc that aren't in use.
}
- (void)viewDidUnload {
// Release any retained subviews of the main view.
// e.g. self.myOutlet = nil;
}
@end
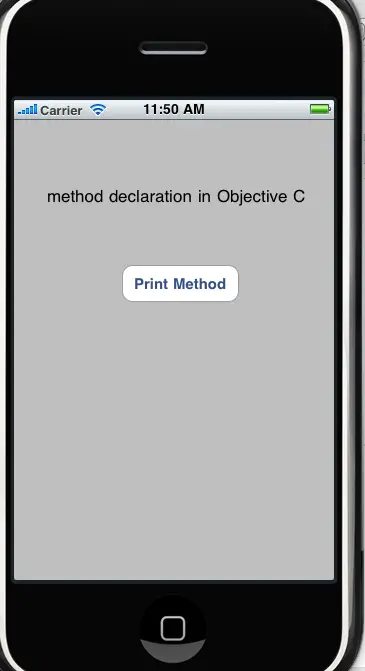
The output is:

Download Code

iPhone UISwitch Action in iphone example

iPhone UISwitch Action

UISwitch Class: Provides a method to control on and off state in your application. For example if you wanted to receive a alert when your application receive any updates you can set it to on, if your application got the switch feature.
In the example we will discuss about the same feature "UISwitch" control and will connect it to a action that will send a action message.
a simple example: UISwitch Action
-(IBAction)switchingbtn:(id)sender {

if(switchControll.on){

[switchControll setOn:NO animated:YES];

showMessage.text = @"Switch is OFF!";

}else{
[switchControll setOn:YES animated:YES];

showMessage.text = @"Switch is ON!";
}
This is a simple action that will be further connected to UISwitch in .sib file. The action will recognize the status of switch control and returns a corresponding message.
You can create you UISwitch either programmatically or simply drag and drop a UISwitch control in the .Xib (nib file). We used the .sib as it's easy and fast. If you are using .sib then declare the UISwitch in header file as given below…

#import <UIKit/UIKit.h>
@interface SwitchActionViewController : UIViewController {
UISwitch* switchControll;
UILabel* showMessage;

}
@property(nonatomic, retain)IBOutlet UISwitch* switchControll;
@property(nonatomic, retain)IBOutlet UILabel* showMessage;
-(IBAction)switchingbtn:(id)sender;
@end
and synthesize the switchControll.. see the code below..
#import "SwitchActionViewController.h"
@implementation SwitchActionViewController
@synthesize switchControll;
@synthesize showMessage;
- (void)dealloc {
[super dealloc];
[switchControll release];
[showMessage release];
}
// Implement viewDidLoad to do additional setup after loading the view, typically from a nib.
- (void)viewDidLoad {
[super viewDidLoad];
showMessage.text = @"Switch is ON!";
}
-(IBAction)switchingbtn:(id)sender {

if(switchControll.on){

[switchControll setOn:NO animated:YES];

showMessage.text = @"Switch is OFF!";

}else{
[switchControll setOn:YES animated:YES];

showMessage.text = @"Switch is ON!";
}
}
- (void)didReceiveMemoryWarning {
// Releases the view if it doesn't have a superview.
[super didReceiveMemoryWarning];

// Release any cached data, images, etc that aren't in use.
}
- (void)viewDidUnload {
// Release any retained subviews of the main view.
// e.g. self.myOutlet = nil;
}
@end
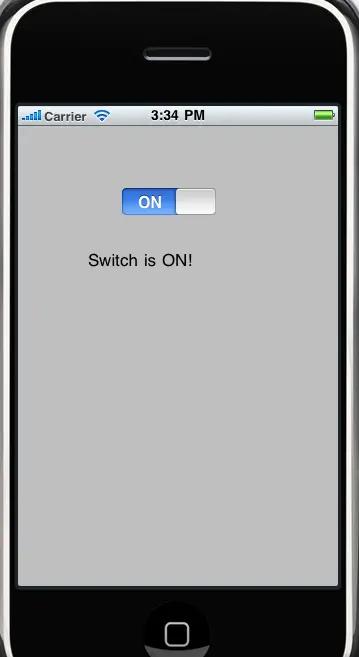
The output is:

Download Code

iphone Objective C Array in iphone exam

Objective C Array

In a simple term we can say that array is a object, which is a collection of number of other objects. In Objective C, we can also add and remove the objects from the given list of array if the array is declared mutable.
Syntax to declare an Array in Objective C:
NSArray *myArray
or
NSMutableArray *myMutableArray
You can declare an array either in header file (.h) or in implementaion file (.m) at the time of implementation.
Declaring an Array at the time of implementation
NSArray *myArray;
myArray = [NSArray arrayWithObjects: @"Red", @"Green", @"Blue", @"Yellow", nil];
or Mutable Array like:
NSMutableArray *myMutableArray;
myMutableArray = [NSArray arrayWithObjects: @"Red", @"Green", @"Blue", @"Yellow", nil];
We can also add or insert more objects in an array even after declaring it if it is a mutable array… for example
"addObject" in an array
NSMutableArray *myMutableArray;
myMutableArray = [NSArray arrayWithObjects: @"Red", @"Green", @"Blue", @"Yellow", nil];
[myMutableArray addObject:@"Orange"];
[myMutableArray addObject:@"Black"];
"insertObject" in an array
NSMutableArray *myMutableArray;
myMutableArray = [NSArray arrayWithObjects: @"Red", @"Green", @"Blue", @"Yellow", nil];
[myMutableArray insertObject:@"Orange" atIndex: 2];
[myMutableArray insertObject:@"Black" atIndex: 5];

Dev iphone NSArray Count Example in iphone

NSArray Count Example

In the example, we are going to count the number of elements in an array in objective c programming.
In Objective C language, Count is a primitive instance method that returns the number of objects available in an array.
Syntax of count method in objective c language
- (NSUInteger)count
a simple example:
// Implement viewDidLoad to do additional setup after loading the view, typically from a nib.
- (void)viewDidLoad {
[super viewDidLoad];

NSArray *marray;
marray = [NSArray arrayWithObject:@"1"];

int mcount =[marray count];

NSLog (@"array = %i", mcount);

if (mcount == 0)
{
NSLog(@"Array is ZERO");
}
else
{
NSLog(@"Array is ONE");
}
return;

}
the output is:
2010-10-05 15:26:05.700 method[1117:207] array = 1
2010-10-05 15:26:05.728 method[1117:207] Array is ONE
Related Tags for NSArray Count Example:

iPhone Dev - Create UIButton in iphone

Create UIButton in iphone

 UIButton *myButton = [UIButton buttonWithType:UIButtonTypeRoundedRect];
    myButton.frame = CGRectMake(20, 20, 200, 44); // position in the parent view and set the size of the button
    [myButton setTitle:@"Click Me!" forState:UIControlStateNormal];
    // add targets and actions
    [myButton addTarget:self action:@selector(buttonClicked:) forControlEvents:UIControlEventTouchUpInside];
    // add to a view
    [superView addSubview:myButton];

Create UILabel in iphone exam

While developing my first iPhone game App, I’m finding Interface Builder very easy to use. However, in my coding, I had the need to add a UILabel programatically. Similar to other languages/platforms I’ve worked with, handling font size, color and weight can be a little confusing.
The code below shows how to:
- Create new UILabel
- Set UILabel position (x,y) to center and size
- Set UILabel font alignment, color, font name and size
- Add UILabel to your View
- Populate UILabel with an NSString for text.

UILabel *scoreLabel = [ [UILabel alloc ] initWithFrame:CGRectMake((self.bounds.size.width / 2), 0.0, 150.0, 43.0) ];
scoreLabel.textAlignment =  UITextAlignmentCenter;
scoreLabel.textColor = [UIColor whiteColor];
scoreLabel.backgroundColor = [UIColor blackColor];
scoreLabel.font = [UIFont fontWithName:@"Arial Rounded MT Bold" size:(36.0)];
[self addSubview:scoreLabel];
scoreLabel.text = [NSString stringWithFormat: @"%d", score];
 
The score value being set is an int that I’m incrementing based on CGRectIntersectsRect of two UIImageViews. I’ll post that example soon.
If you’ve got a better, more efficient way of doing the above, please feel free to comment.

Các hàm cơ bản trong lập trình iphone

CÁC HÀM CƠ BẢN TRONG
LẬP TRÌNH ỨNG DỤNG IPHONE


I – Câu lệnh IF


Lưu ý: Điệu kiện là một câu hỏi mà câu trả lời là YES hoặc NO

Ví dụ:

if ( a > b ) a có lớn hơn b không?
if ( a > = b ) a có lớn hơn hoặc b không?
if ( a < b ) a có hơn b không?
if ( a <= b ) a có nhỏ hơn hoặc b không?
if ( a == b ) a có b không?
if ( a != b ) a có b không?


II – Câu lệnh IF -ELSE


III - Vòng lặp FOR


Kết quả


IV - Vòng lặp WHILE


Kết quả


V - Vòng lặp DO - WHILE


Kết quả


VI - Mảng - ARRAY


Kết quả

Lập trình iPhone - Đối tượng UIImage - Chèn hình ảnh vào ứng dụng iPhone

ĐỐI TƯỢNG UIIMAGE

I – Giới thiệu:

UIMage dùng để hiện thị 1 hoặc 1 nhóm các hình, có thể dùng các hiệu ứng animation để hiển thị hình ảnh.


II – Sử dụng:


III – Lưu ý:

1 – Các dạng extensions hình ảnh được hiển thị tốt trên iphone


2 – Các hàm khởi tạo đối tượng hình
+ imageWithContentsOfFile:
+ imageWithData:
+ imageWithCGImage:
+ imageWithCGImage:scale:orientation:
+ imageWithCIImage:
+ animatedImageNamed:duration:
+ animatedImageWithImages:duration:
+ animatedResizableImageNamed:capInsets:duratio
– resizableImageWithCapInsets:n

– initWithContentsOfFile:
– initWithData:
– initWithCGImage:
– initWithCGImage:scale:orientation:
– initWithCIImage:

3 - Thuộc tính của 1 đối tượng hình
imageOrientation property
size property
scale property
CGImage property
CIImage property
images property
duration property
capInsets property

Thiết kế Game đổ xúc xắc trên iPhone

THIẾT KẾ GAME ĐỔ XÚC XẮC

Viết ứng dụng giả lập trò chơi đổ xúc xắc có tính điểm như sau:


Yêu cầu:

1 - Mỗi lần chạy ứng dụng, cho người chơi 100 điểm
2 - Người chơi có thể chọn Tài hoặc Xỉu (Tài <=3, Xỉu >3) hoặc Chẵn lẽ tuỳ bạn. Rồi click nút Đổ xúc xắc
3 - Nếu thắng, người chơi được cộng thêm 20 điểm. Nếu thua, bị trừ 20 điểm
4 - Nếu người chơi bị 0 điểm, hiện thông báo "Bạn đã thua hết điểm rồi" và không được Đổ xúc xắc nữa.

Có thể download hình 6 mặt xúc xắc tại http://khoapham.vn/nhatnghe/iphone/xucxac.zip

Lập trình iPhone - Đối tượng NSTimer - Quản lý các thời gian trên 1 ứng dụng

NSTIMER

I – Giới thiệu:

NSTimer là đối tượng có thể chạy ngầm 1 hành động nào đó sau 1 khoảng thời gian được đặt ra trước.

Nhờ đặc tính đó, NSTimer có thể dùng cho các hiệu ứng diễn hoạt animation, đo đếm thời gian…


Ví dụ: Viết ứng dụng thi trắc nghiệm, dùng NSTimer để giới hạn thời gian làm bài là 15 phút. Hay đơn giản hơn là hiện đồng hồ thời gian ra ứng dụng, dùng NSTimer để yêu cầu cứ mỗi giây cập nhật lại thời gian mới


II – Sử dụng NSTimer

A – Khởi tạo đối tượng NSTimer

+ scheduledTimerWithTimeInterval:invocation:repeats:
+ scheduledTimerWithTimeInterval:target:selector:userInfo:repe ats:
+ timerWithTimeInterval:invocation:repeats:
+ timerWithTimeInterval:target:selector:userInfo:repeats:
– initWithFireDate:interval:target:selector:userInfo:repeats:

B – Kích hoạt đối tượng NSTimer
– fire

C – Dừng đối tượng NSTimer lại
– invalidate

D – Lấy thông tin của đối tượng NSTimer đang kích hoạt
– isValid
– fireDate
– setFireDate:
– timeInterval
– userInfo

E - Công thức chung

PHP Code:
+ (NSTimer *)scheduledTimerWithTimeInterval:(NSTimeInterval)seconds target:(id)target selector:(SEL)aSelector userInfo:(id)userInfo repeats:(BOOL)repeats 
Tham số:

seconds : Tốc độ chạy của NSTimer. Càng nhỏ thì chạy càng nhanh. Đơn vị là giây. Nếu seconds < 0 thì hệ thống tự động gán giá trị là 0.1 milisecond.

target : Khai báo đối tượng nào sẽ chứa NSTimer (Thường là self: vì NSTimer chạy ngay trên view đang hiển thị)

aSelector : Khai báo tên hành động để NSTimer thực thi nó trong thời gian NSTimer này đang được kích hoạt

userInfo : Thông tin của đối tượng NSTimer đang thực thi. Thường là nil

repeats: Nếu được gán là YES, thì NSTimer sẽ lặp đi lặp lại aSelector cho đến khi nó gặp lệnh dừng lại. Nếu được gán là NO, thì NSTimer chỉ chạy aSelector 1 lần duy nhất rồi dừng lại chứ không có lặp đi lặp lại.

Thiết kế trò chơi Gam Đua Thú (NSTimer, UISlider, Segment)

THIẾT KẾ ỨNG DỤNG GAME ĐUA THÚ


Mô tả:

- Khi bắt đầu trò chơi, người chơi được tặng 100 điểm.
- Người chơi đặt cược vào 1 con vật nào đó rồi click nút Chạy đua nào!!!!
- 4 con vật cùng chạy với tốc độ random bất kì, lúc nhanh lúc chậm khác nhau.
- Khi 1 con về đến đích thì cả 3 con kia cùng dừng lại.
Nếu con về đích trùng với con mà người chơi đã chọn, thì hiển thị ra màn hình "THẮNG RỒI, BẠN ĐƯỢC + THÊM 20 ĐIỂM". Ngược lại hiển thị "THUA RỒI".

Lập trình iPhone - Đối tượng UIAlertView - Hiển thị hộp thông báo và nhập liệu.

UIAlertView

I – Giới thiệu:

Dùng class UIAlertView để hiển thị nội dung thông báo cho người dùng, hoặc dùng để cho khách hàng nhập liệu


II – Cấu trúc:

A – Khởi tạo đối tượng UIAlertView

– initWithTitle:message:delegate:cancelButtonTitle:otherButton Titles:

B – Gán thuộc tính cho UIAlertView

• delegate property
• alertViewStyle property
• title property
• message property
• visible property

C – Cấu hình các button bên trong UIAlertView

• – addButtonWithTitle:
• numberOfButtons property
• – buttonTitleAtIndex:
• – textFieldAtIndex:
• cancelButtonIndex property
• firstOtherButtonIndex property

D – Gọi 1 UIAlertView

– show

D – Hủy 1 UIAlertView

– dismissWithClickedButtonIndex:animated:

E – Thuộc tính của UIAlertView

alertViewStyle : Kiểu của 1 alert view khi hiển thị trên ứng dụng
cancelButtonIndex: Vị trí của nút Cancel trên UIAlertView
delegate: Đối tượng nhận giá trị từ UIAlertView, thường có giá trị là nil
firstOtherButtonIndex: Giá trị của nút đầu tiên bên trong UIAlertView. Giá trị này mặc định là 0
numberOfButtons: Tổng số lượng button bên trong 1 UIAlertView
title: Tiêu đề của UIAlertView, mỗi view có 1 title duy nhất
visible: Nếu có giá trị là YES, View sẽ được hiển thị cho người dùng thấy, ngược lại là NO


F – Các hàm hỗ trợ


addButtonWithTitle: Thêm button vào trong View với title cho trước. Hàm này trả về mã giá trị của nút vừa thêm
buttonTitleAtIndex: Trả về title của 1 button trong AlertView
dismissWithClickedButtonIndex: Vô hiệu hóa 1 button trong AlertView
initWithTitle:message:delegate:cancelButtonTitle:otherButton Titles: Khởi tạo 1 đối tượng UIAlertView
textFieldAtIndex: Truy cập đến 1 textfied nào đó bên trong UIAlertView. Thường dùng để lấy giá trị khách hàng nhập vào.

G – Các kiểu UIAlertView

1 - UIAlertViewStylePlainTextInput


2 – UIAlertViewStyleSecureTextInput


3 – UIAlertViewStyleLoginAndPasswordInput


4 – UIAlertViewStyleDefault


III - Cách sử dụng:

B1: Khai báo trong file .h

PHP Code:
UIAlertView *thongbao3

B2: Khai báo code gọi UIAlertView trong file .m

PHP Code:
thongbao3 = [[UIAlertView alloc]

    
initWithTitle:@"TRUNG TÂM ĐÀO TẠO MẠNG MÁY TÍNH NHẤT NGHỆ" 
    
    
message:@"Đăng nhập kho tài liệu của Nhất Nghệ" 

    
delegate:self
 
    cancelButtonTitle
:@"Thoát"
 
    
otherButtonTitles:@"Đăng nhập"nil
];
thongbao3.alertViewStyle UIAlertViewStyleLoginAndPasswordInput;    

[
thongbao3 show]; 
B3: Viết code truy cập giá trị bên trong các UIAlertView

PHP Code:
-(void)alertView:(UIAlertView *) alertView clickedButtonAtIndex:(NSIntegerbuttonIndex {

    if( 
alertView == thongbao3 ){
        if(
buttonIndex==1){
            
NSString *un = [[alertView textFieldAtIndex:0text];
            
NSString *pa = [[alertView textFieldAtIndex:1text];
            
NSLog(@"Username:%@",un);
             
NSLog(@"Password":%@",pa ); 
        }
        
        }

Viết ứng dụng tính tổng 2 số trên iPhone

VIẾT ỨNG DỤNG TÍNH TỔNG 2 SỐ TRÊN IPHONE


Yêu cầu:
1 – Tạo Application icon và Launch Image cho ứng dụng
2 – Định dạng màu chữ & nền các đối tượng như trên hình
3 – Tính ra tổng 2 số khách hàng đã nhập

BẮT ĐẦU:

Phần 1: Tạo Application Icons và Launch Images

B1: Khởi động xCode, click chọn Create a new Xcode project


B2: Chọn kiểu ứng dụng là Single View Application, click Next


B3: Đặt tên project như sau:
Product Name: bai1
Company Identifier: NhatNghe
Class Prefix: nhatnghe
Device Family: iPhone
Bỏ check Use Storyboard, Use Automatic & Include Unit Tests

Click Next.

B4: Chọn folder chứa Project: Desktop/Ho_Ten_Cua_Hoc_Vien

- Click Create

B5: Trong khung Project Navigator, Click chọn bai1. Chọn Summary, cuộn xuống tìm App IconsLaunch Images

- Kéo nhatnghe.PNG vào App Icons bai1.PNG vào Launch Images


B6: Click chọn file nhatngheViewController.m, Tìm function viewDidLoad(), gõ thêm dòng sleep(5);


Run ứng dụng xem kết quả

Phần 2: Tạo các đối tượng trên form và viết code xử lí

B7: Click chọn file nhatngheViewController.xib. Kéo các đối tượng như sau vào ứng dụng


B8: Khung , click chọn
- File nhatngheViewController.h, bổ sung cặp ngoặc nhọn như sau:


B9: Click chuột vào ô textfile 1, đè phím Ctrl, kéo chuột thả vào bên trong cặp {} của file nhatngheViewController.h


- Chọn Connection: Outlet
Name: txtNumber1


- Làm tương tự cho txtNumber2lblResult


B10: Kéo button Tính Tổng, cấu hình như sau:


Lưu ý: Vì đây là 1 button, khi click button thì ứng dụng sẽ thực thi 1 function, do đó, kéo button vào ngay sau dấu }
Xem kết quả:


Phần 3: Viết code cho hàm tinhTong
- Mở file nhatngheViewController.m, tìm hàm


Code:
- (IBAction)tinhTong:(id)sender {

}
- Viết code sau:


Chú thích:

- txtNumber1.text: Lấy chuỗi khách hàng nhập vào textfield txtNumber1

- floatValue: Để tính tổng, hàm này ép chuỗi khách hàng nhập về dạng float

- stringWithFormat: Hàm này tạo ra chuỗi kết quả để xuất vào label lblKetQua

Run ứng dụng để xem kết quả